Basic Composition
In its most basic definition, composition is the arrangement of the elements of your image as part of the whole. Composition, as well as lighting, is the key way that photographers put subjective input into an image. Therefore, it’s important to put your own creative touch on composition. There is no right or wrong to composition. It’s definitely an art, not a science.
“There are no rules for good photographs, there are only good photographs” – Ansel Adams
That said, there are a few tried and true composition rules that often make images more visually pleasing to audiences. Proper composition will emphasize the subject to the viewer.
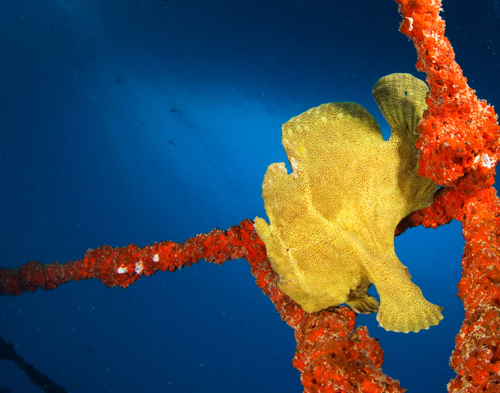
Composition Doesn’t Just Happen
Beginner photographers often see a subject they like and just start shooting. Taking some time to think about how the subject would look best in the frame and within its environment can dramatically increase the impact of the image.
This guide will provide you with some basic composition tips that will help improve your images. Many of these tips are not specific to underwater photography and will be relevant to all of your photography efforts. While these are basic guidelines that work, they are merely a starting point for you to eventually develop your creative vision.
Camera Orientation: Portrait or Landscape
There are two general orientation options of our camera, vertical and horizontal. When we shoot vertically, it is referred to as “portrait” and horizontal images are referred to as “landscape”. Be sure to approach every subject with an open mind. Feel free to shoot both portrait and landscape images of the same subject. Sometimes you might surprise yourself and find the orientation that you wouldn’t have originally chosen is better than you thought.
Enough Fish Butts and Dorsal Fins
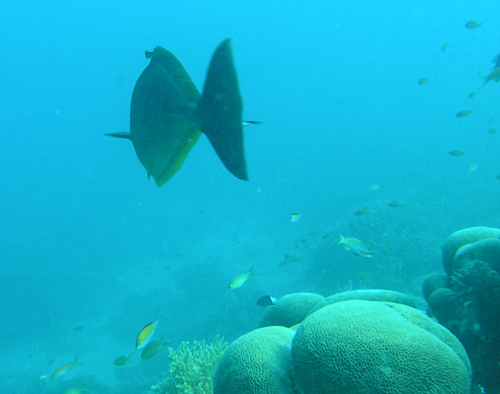
When diving, we are in a three dimensional world, and when swimming over a reef, we are usually looking down on the life below. Resist the urge to just start shooting the top of the fish. You usually need to get below the fish, or at least at eye level, in order to make a pleasing image. Therefore, always remember this when composing your shots - get low and shoot up. No more dorsal fin shots!
Another common mistake is scaring the subject and then chasing after it to get the shot. Fish swim faster than you. You will never catch up. You will end up with fish butt shots. Be patient and take the time to wait until the subject is facing you. As to be discussed later, eyes are the most important part of the subject. A viewer can't relate to a subject without eyes.
Don’t Cut Off Parts of Your Subject
Avoid cutting off parts of your subject with the edges of the frame. Sometimes it is okay to not include the entire subject in the photo. This is usually true for creative macro shots where the frame is filled with a strategic part of a subject. If you can’t include the entire subject in the shot, it will only work with a creative composition, like a face portrait or eye shot. However, cutting off part of the subject when the shot was clearly meant to include it in its entirety will result in an image that subconsciously reads as being incomplete.
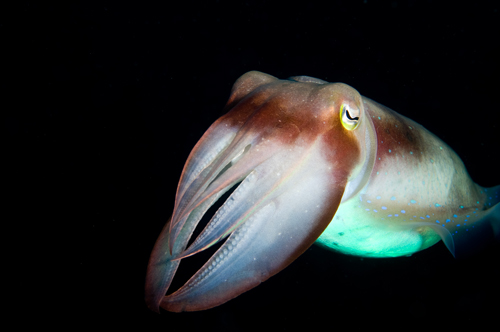
This is a well lit, sharp image of a cuttlefish, but unfortunately part of the animal is cut off. Make sure you get the entire subject in the frame
Focus On the Eyes
Some people say that the most important rule of wildlife photography is making sure the eyes of the subject are in sharp focus. Out of focus eyes means that you will lose the focus of your audience. This makes sense as humans show a lot of expression in our eyes. When we talk to one another, we look at each other in the eye. Therefore, it’s only natural for us to be drawn to the eye in the image. If you are shooting with large apertures or with high magnification macro lenses that have shallow depths of fields, it is very important that you ensure the focus point is on the eye. Luckily, eyes usually offer good contrast and auto-focus can pick them up well. By locking the focus on the eye, and then composing your image, you have the best chance of keeping this important feature sharp.
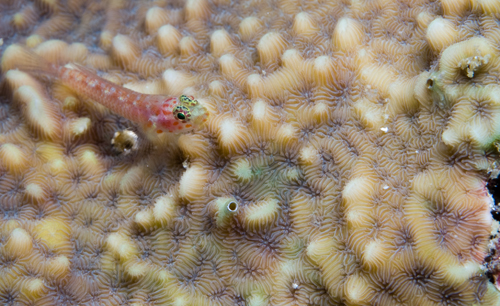
Even if the rest of the subject is out of focus, it's the eyes that need to be sharp
Give Fish Room to Swim
Any subject that is actually, or potentially could be, in action should be placed far from the edge with room to “swim into the frame”. In other words there should be more space in front of the swimming fish then behind it. If the moving object is close the edge, it looks like it may “swim” of the edge, which subconsciously makes the viewer uncomfortable.
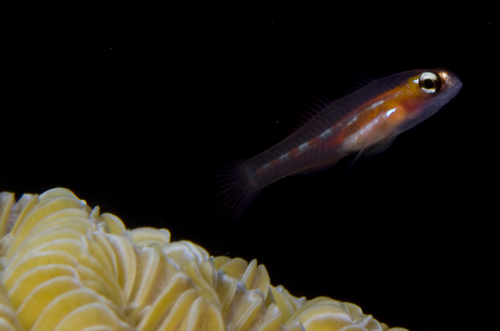
Here the fish appears to be swimming out of the frame, which is uncomfortable to the viewer
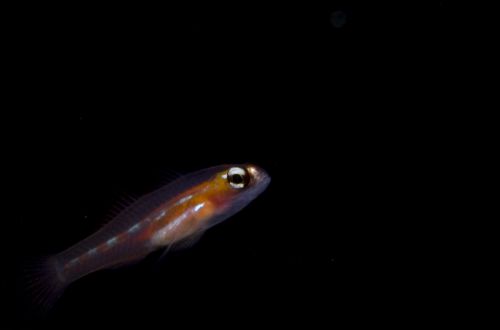
This is the same fish as above, but the image is cropped so that fish is swimming into the frame, which feels much more natural
The Rule of Thirds: Don’t Aim For the Bulls Eye
The rule of thirds might as well be called the golden rule of photographic composition. This rule dictates that an image should be divided up into thirds both horizontally and vertically, and the important elements of the image should fall on or close to the intersections. Aligning key compositional elements of the image with these intersection points will make an image more interesting.
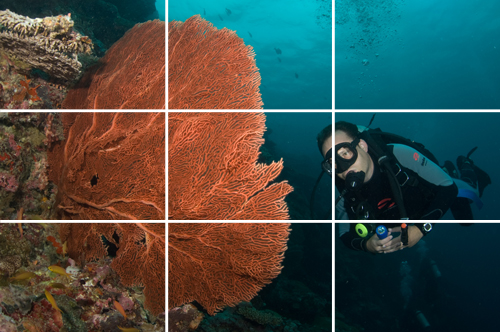
A focal point of the image, the divers eyes, were aligned close to a point where the lines intersect to make the image more interesting
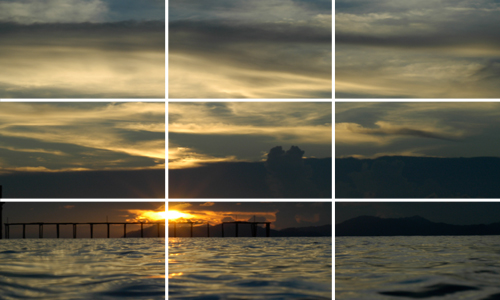
Here the horizon line was placed in the bottom third of the image, rather than in the middle
Lines, Shapes and Colors
Diagonal Lines
Adding a diagonal flow to the placement of your subject(s) and/or background, can be one of the major ways to make your images more dynamic, creating more interest for the viewer.

Here the ornate ghost pipefish is shot to utilize diagonal lines in the compositions
Non-Diagonal Lines
Lines are more common in the underwater world than you may think. Using these lines effectively can help improve an image's composition.
Different types of lines have different qualities that can change the impact of the image. For example, vertical lines imply strength and power. If you wanted to emphasize the size of something, say, large barrel sponges or massive stalactites, shooting them vertically can help.
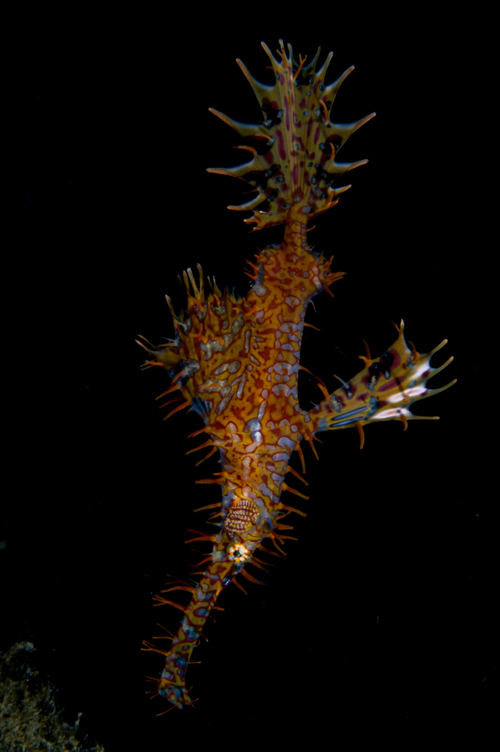
This is the same pipefish, this time shot utilizing vertical lines in the composition
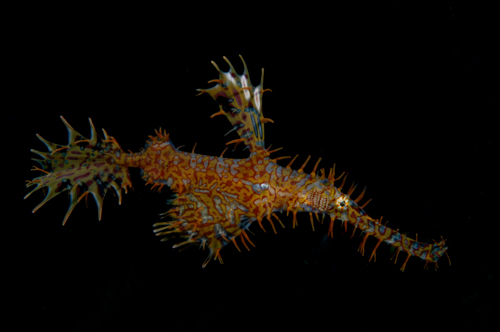
Here is the same pipefish again, but shot horizontally. Note the different effect the different kinds of lines have on the image
Leading Lines
Lines are often essential in creating “eye flow,” the path the viewer takes when looking at an image. In a well composed image, the photographer will have dictated where the viewer starts looking at the image and the path their eyes travel across the image using careful composition. The audiences’ entering and exiting points should not be arbitrary.
Leading lines are lines that lure the viewer, either through the image or to the important feature. Often your diagonal lines are leading lines by starting in one corner and leading the viewer’s eye to the opposite corner. Try aligning your leading lines with your rule of thirds intersections.
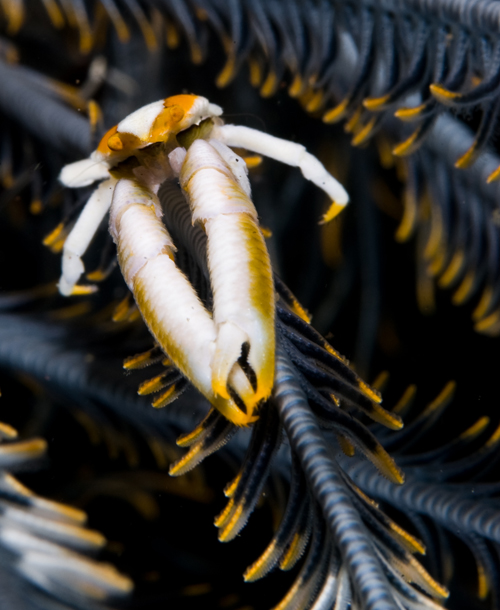
The squat lobsters claws and the crinoid are good examples of a leading line in an underwater image
The S-Curve
S curves are an interesting type of leading line. An S curve need not be strictly an S shape, but rather some sort of curved or zigzagged line. The point of the curve is to allow viewers to really get into the image as they follow the line through the frame. S-curves in topside images are often utilized in peaceful scenes, such as windy streams in the countryside, footpaths in forests, or fences in farms. The organic shape of the line naturally lends itself to creating “eye-flow.”
Underwater, an S curve can be almost anything. When shooting macro you can incorporate s-curves by shooting long subjects such as pipefish or gobies in a curved position, or subjects that naturally curve in multiple directions like seahorses or sea snakes.
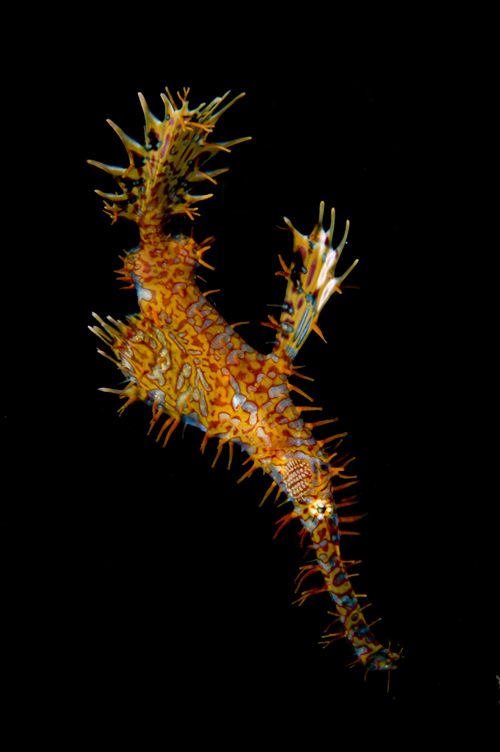
Finally, the same ghost pipefish was shot to utilize an S curve, adding a different dimension to the image
When shooting wide angle you can use the S curve similarly to topside shooters, finding lines within coral formations or among larger animals that pull the viewer in and through the image. Additionally large schools of fish often form S curves, and when captured in an image it will give the school a sense of order.
Beware of the Background
Creating contrast between the foreground and the background is sometimes difficult, but always essential. Failing to do so can lead to the viewer being distracted from the main subject by the unsightly background.
You have spotted a rare nudibranch or other subject of interest, and with excitement you adjust your strobes, focus and fire. You take a quick a look at your LCD screen to review the shot, and notice it’s well exposed but you can’t find the subject. Well, the little guy is hard to find because there are a few different colored sponges and soft corals in the background of the image distracting the eye from the subject.
The human eye can easily distinguish between different elements in nature; however, photographs are two-dimensional and have a tendency to flatten and merge the background with the foreground. Thus, the aforementioned nudibranch stands out to your eye, but not in your image.
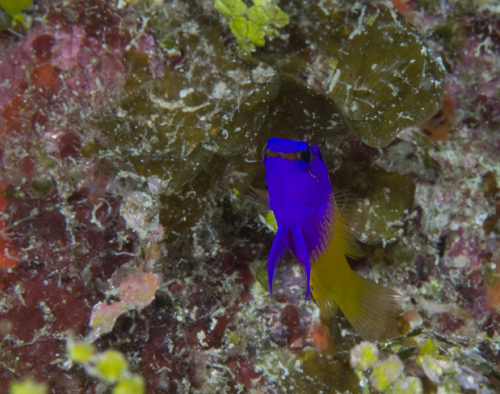
Here the subject looks pretty good, but the distracting background behind it takes away from the impact of the image
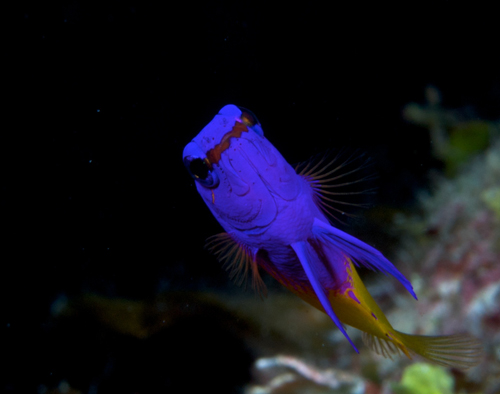
Here the same fish was shot against a mostly black background. This creates much better contrast between the foreground and the background and makes the subject look much better
Often times subjects are not situated against a good background. The challenge is to figure out a way to create proper contrast between your subject and your background. The most obvious way to eliminate distractions is to change your position or angle. Sometimes we are so excited to find a subject that we try and shoot it in whatever way we first approach it. Step back and think - what is in the background and is there a better background from a different position or angle?
Shooting at an upward angle in order get more open water in the frame is a common way photographers remove distracting backgrounds. By minimizing the amount of “stuff” that is in the frame you add emphasis on the subject. Having more than a few primary points of interest in an image is very distracting.
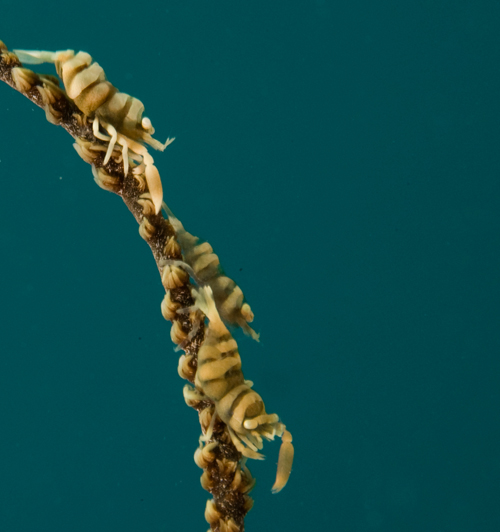
The whip coral shrimp were shot from below at an upward angle so only open water is in the background, creating good contrast between the background and foreground
Tip: If you can’t frame the foreground so that it is separated from the background, adjusting your settings may help. Try closing your aperture and increasing your shutter speed, thus decreasing the amount of light that hits the sensor. If you use extreme side or top lighting, you can light up the foreground subject, while minimizing the light in the background, thereby reducing its effect on the image.
Alternatively, you can use a large aperture to blur the background. Sometimes this lets too much light into the background, but an out of focus distracting background can be better than an in focus one. Sometimes if there is a distracting coral in the background, using a larger aperture can blur it out so it’s actually an interesting background. For more on this technique, read the article on Bokeh.
Contrasting Colors
Setting your primary subject against a contrasting color is a surefire way to create images that pop off the screen or page. Choosing the color of a background to complement the subject, be it blue or green water, a blacked out background or the colors of another object can make or break an image.
For example, an image of a beautiful red soft coral is more visually striking when taken against a blue background of open water rather than against a busy background of the various life forms on a wall. While you may know that the subject was the red coral, it may be hard for your uniformed viewer to tell what the subject is in the later scenario.
Macro photographers often isolate subjects on monochromatic backgrounds. A lot of times a colorful macro subject looks good when contrasted with a pure black background. To read more about getting a black background, please visit our guide on Underwater Macro Photography.
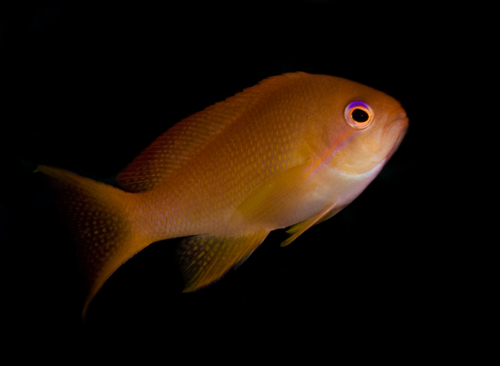
The black background contrasts well with the bright colors of the anthias
Negative Space
Using the negative space - the part of the frame that has no shapes or objects – can become a major element of your composition. In underwater photography we ordinarily refer to the blue (or green) water or black backgrounds as the negative space.
Of course, good use of negative space implies that the subject is an area in which negative space can be utilized properly. Given that underwater photographers are shooting wild animals that have not been posed in anyway, this is not always possible. In these cases, you just do the best you can.
Framing Your Subject
Framing subjects with other objects or with negative space can yield pleasing results. A cuttlefish with a black background can be nice, but if you can also light up two nice red sea fans it’s swimming between, the image becomes more interesting. See the whole frame. Think about if it can be improved. Then shoot.
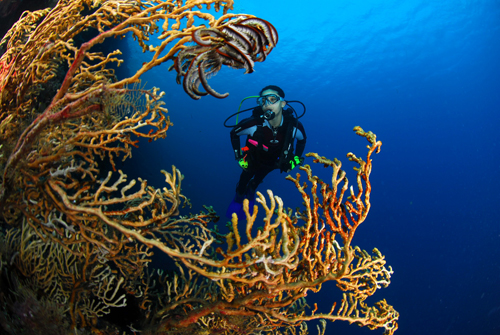
Jason Heller used the reef to frame his wife, Wendy, in this image
Creating a Sense of Scale
Wide-angle photographers often utilize objects in the background to increase the appeal of the image. Often a model (another diver) is placed in one of the upper corners of the background, following the rule of thirds, to create depth and show perspective. With just open water in the background, it’s impossible to get a sense of the depth. Placing a figure like a human in the background will create perspective. The key here is that we can relate to the size of another human, and use it to get a sense of size and depth in an image. For more on using models in composing wide-angle images, visit the wide-angle section.
If you don’t have a model off hand, including another object, like the silhouette of your dive boat, in the background can also achieve similar effects. With patience, an interesting animal like a shark or turtle may swim in the frame in a way that can provide a similar sense of perspective.
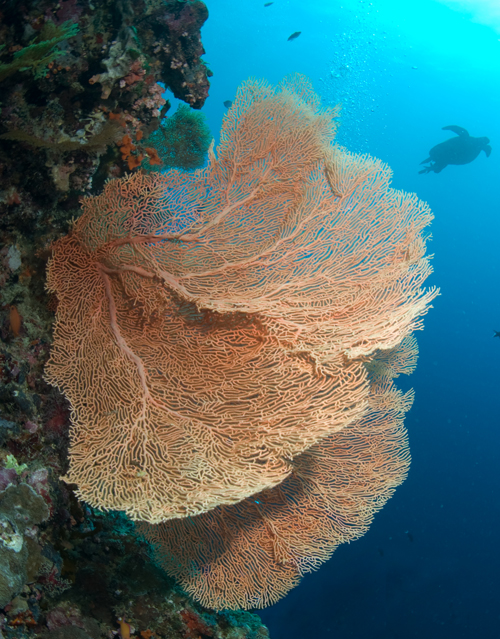
The turtle in the upper right corner gives some perspective to the image
Shooting Into the Sun
A unique element of underwater photography is that we can shoot into the sun, and even include it as part of the composition. Of course, to what extent you can include the sun depends on the quality of the sensor in your camera. For more on shooting into the sun, see the section of sunbursts.
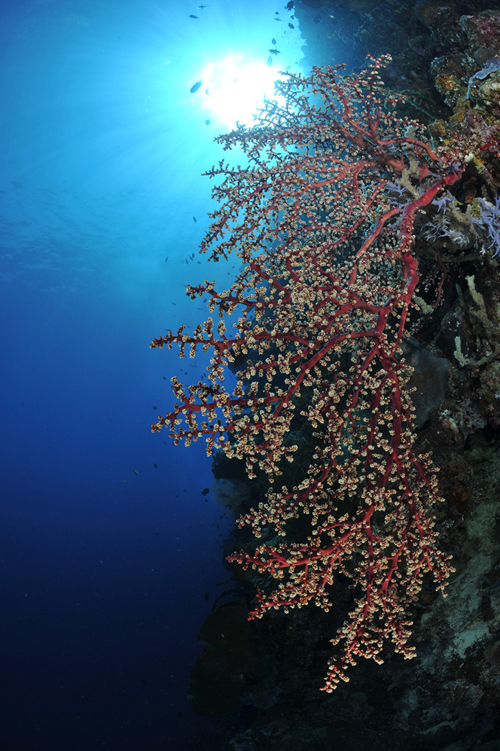
In this image Jason Heller uses the sun in his composition
Fill the Frame
Lastly, if shooting macro you can get in closer to try and fill the frame as much as possible with the subject. Sometimes a close-up portrait is better than a full body shot with a distracting background.
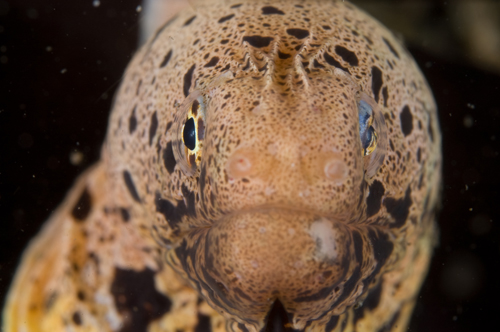
This eel in Lembeh Straights could not be shot with a suitable background behind it, so the frame was filled with the subject
Rules Are Meant To Be Broken
These rules are just guidelines. As with every rule, there are always exceptions. Really great composition comes from a photographer’s imagination, and truly fantastic images are products of creativity—not a list of rules. Think outside the box, but keep these guidelines in the back of your head when first starting out.
Return back Techniques Section.
RELATED CONTENT
Featured Photographer


 Antarctica


